Wildgoose Chase Moto Guzzi Tips and Tricks
Currently, I am wanting my visitors to send in ANY tips or tricks they may have. You will get full credit for it, along with the admiration of your fellow Guzzi riders. You just may help someone get home in one piece too. Come on, Send it in.
Best and Worst Riding Roads in the USA
Eliminate those Pop-Up Advertisements from websites
ABS Repair Tip from Norman Schultz:
Black abs saddlebag repairs can be accomplished with a repair kit called "duramix' semi rigid plastic repair. the kit contains a tube of two part solution that mixes as it is plunged out of the tube. the mix hardens in fifteen minutes and dries to a semi hard plastic that matches black abs perfectly. the saddlebags on my v11ev had some deep scratches which i filled with this mix and the results were great. the mix filled the scratches and did not need painting since it turns into a black abs. the kit comes with a plastic mesh that can be used if a hole has to be filled or reinforced. my son has a sport bike with abs fairings and we used the mix to repair a hole about two inches in diameter and it was strong and flexible. i purchased the mix at an automotive paint supply store. the brand name is duramix #4049. the manufacturer is polymer engineering corp., 1630 fiske pl., oxnard, calif. 93033 (800-537-9204)
V11 EV Air Filter tip from Wildgoose: Just installed the Amsoil air filter (P/N 1938) and I give it an "A". Very noticeable difference. The bike breathes better, runs smoother and increased gas mileage by 2 miles. Call 1-800-777-7094 They will ask for a customer #, give them # 502910 and order air filter # s1938.
V11 EV Air Filter from Steve Saady:
The K&N Air filter part number for stock 1064cc air boxes? It is 33-2682, and crosses w/ Fiat part number "Fiat 4434868". I have my K&N box here, it has 33-2682 on it, and if you go to
http://208.196.170.231/cgi-bin/crossrefperl.pl, look up on Fiat, it is one of the Fiat's listed.
This is available for about 55 USD at Moto International, www.MotoInternational.com and other Moto Guzzi dealers and shops.
Amsoil Oil Filter Tip from Lowery: Amsoil now lists Motorcycle specific (Moto Guzzi Specific) oil filters. New, deep sump bikes part #'s are SMF 125, and for older bikes, use part number SMF124. Price is $8.75 each.
V11 EV Oil Filter tip from Wildgoose:
Replacement oil filters that work great are either the AC-Delco PF53, or the Fram 6022. I personally run the AC in mine.
Other compatible filters are: Fram PH3614, Mobil-1 (M1-102),Deutsch (D-364),STP (SMO-22(, Bosch (3330) and Super Tech (ST3614). If you opt for a chrome filter, you can use the one for a new Harley VRod. These look good and work good on external oil filter kits.
Amsoil now lists a motorcycle specific, Moto-Guzzi specific oil filter. Newer deep sump bikes part#SMF 125. For older bikes it is part#SMF 124. Price is $8.75.
Fuel Filter tip for EV from Wildgoose: Replace the fuel
filter with NAPA Part number 3008. Almost an exact fit. I had to put a little
tape around the filter so it would fit snug in the holder. Napa cost - $15.00, Guzzi
cost - $70.00. I'll go with NAPA. Probably will fit Bassa, Jackal (Special
Sport, Stone) as well. The Wix number is 33008. AutoZone FF600 $9.99 with washers.
Battery Tip from Allesandro:
Here is a tip for Ambassador and Eldorado owners. When I needed a new
battery for my 1970 Ambassador, I found that an EverStart battery from
Wal-Mart works great. It fits perfect in the battery box. The part number is
56-5. It has 665 cranking amps and 535 cold cranking amps. I bought mine on
sale for $29.95. It has been in my bike for two years and I have had no
trouble with it. Give it a try next time you need a battery.
Alessandro Centofanti
Battery Tip from Andy Hill:
I sent this one to the club newsletter awhile back, but maybe it has a
place here, too. this is for the guys using garden-tractor or car batteries
in their bikes.
These batteries lack a decent vent system- they have small slots in the
caps, resulting in noxious fumes eating the paint off the frame,
battery tray, and the insides of the side covers. all I did was dig up a "T" &
an elbow fitting from my scrap vacuum line pile. [used on cars].
drill out the vent slots with a 3/16" drill bit, blow the plastic chips out
of there, then install the "T" in one cap, and the elbow in the other.
connect the two with a short piece of hose, then run a long one from the
remaining leg of the "T" down the frame to the air.
Takes longer to describe it than to do it! my Eldo came to me with allot
of corrosion in the battery area, but looks great now- maybe this works. :>)
Andy hill
Followup from Terry Troutt The tractor batteries not only don't vent well, I've had one blow up
right in the bike. I now buy Wal-Mart motorcycle batteries that match the Harley listing. They seem to work well. #ES16B about $35.00.
Battery wire up grade tip from L&A Robertson:
While recently going though some starter woes I got a suggestion that the original wires may not be up to snuff so I went to my friendly sears and got to looking at the lawn mower starter and I noticed that the cable was much heaver than on my Ambo.....My original wires seemed to be about 10 gage.. I am using a Lawnmower battery (vented of course) So I went to Auto zone and bought some 4 gage universal starter wire 24" long one red one black and hooked them up now it cranks hot cold when ever I need the total cost was about $10.00
Odyssey Battery Tip from John Henry:
I am aware that a popular replacement for
the original battery in several Guzzis is the Odyesssy model PC-625. I am also
aware that you can no longer use the tool tray that comes under the seat.
For 30 bucks more, the Odyessy model PC-925-L is the correct replacement for
what, (at least) came in an '01 EV. Probably the same for '98 & '99 too. Not
sure about others. Because the terminals are a differernt angle, it is a PITA to
get the bolts in. Also, the dimentions are just different enough that you cannot
use the hold down. It was necessary to put the tank bolt back without it having
it hold the tool tray too. But the tool tray still fits under the seat ok.
Everything is pretty secure and because of how the terminals are oriented, I see
no danger of shorting out against the frame or anything. I believe the
difference between the 925 and the 925-L is that the terminals are swapped
around. There is also a designation with that called MJ. That means the batt has
a metal jacket. (The dimentions don't change.) The number would look like this
PC-925-LMJ. With or without the metal jacket, you would want the "L" designation
so as to have the terminals on the proper ends.
By comparison, it is my understanding that with the 625, it is necessary to use
some styrofoam or something to take up the extra space and stabilize the battery
from moving around. Possibly above it too. It also has about half the capacity
of the 925.
I know many people opt for the smaller of the two, both for weight savings and
cost. I felt I wanted to retain my tool tray and also have more capacity for
running the extras like GPS, XM Radio, and heated vests/gloves. (Yes plural, for
two at times.) Before you comment on the last part, I understand that will not
keep the battery from discharging when running around in town. What it will do
is have more reserve so that it would not reach a critical low as quickly. A new
volt meter awaits installation also in order to monitor that situation.
There is of course the inexpensive "garden tractor battery", HD Battery, etc.
I like the idea that the Odyessy will not leak, make fumes, or corode the stuff
near it. Also they bill the 925 as having an expected service life of 5-8 years!
$130.00 doesn't seem so bad for that kind of life. It also has a shelf life of
two years which means it will not be necessary to charge it once a month for us
northerners who cannot ride year round.
I thought I might throw this out there for anybody interested. I am aware that
we all have different reasons for what we do to our bikes, so this might not fit
your plan. But hey, that's what it's all about.
Zoom Zoom,
John Henry
'01 EV
V11 EV front wheel bearing
replacement by Wildgoose:
I just recently had to replace the front right
wheel bearing on my EV. This a standard bearing that I was able to acquire from
Napa. Part number 6304 2RS (2 rubber seals).
Same price as a Guzzi dealership ($49), but I
don't have a close dealer, so I didn't have to wait for shipping.
Update - This
same bearing price should be $13 or less from bearing house or Grainger. I have also
seen the 6304 2RS listed in JC Whitney for $6.
Another Bearing tip from Ron Bishop: -new
Brake Light Visibility Tip from Joseph Roberts:
Here is a tip for those who want to be sure motorist see them braking. There are several blinking brake lights available and most cost quite a lot. I found in an Advance Auto parts store(and others) a rack with items labeled FAST and FEROUS as in the movie I would guess. I bought a light that has red blinking LEDs and a center white strobe light that lights when I hit my brakes. Really gets motorist attention and the light is DOT approved and legal in all 50 states. Easy to mount and wire and it only cost $25.00. Measures about 3/4" thick and 2" long. Ride Well Joe
Brake Light Visibility Tip from Roy in Germany:
I
have a flashing rear brake light from signalfly. there is a part of it that mounts on the
back of your helmet with a steady light and when you hit your brakes it has a line of leds
that flash. the sender is mounted on the rear of the bike. it is a line of sight
transmitter hooked into the brake light. it is a bit pricey but really gets the message
across, oh yes it comes with rechargeable batteries and a charger. individual parts are
available also.
Roy in Germany.
Brake Tuning Tips for the Loopers
Brake Tuning Tip from
John Wells:
After looking for some time for a procedure for fine tuning the connecting linkage
on the front brakes for optimum performance, I found the following on Paul Friday's UK
site for the Nuovo Falcone (http://www.devce.demon.co.uk/falcone.htm ). Made more
sense than other explanations I've found, and worked terrific on the Eldo and Ambo I've
tried it on so far.
Front brake performance on the '73 Eldo was less than perfect, with a fair bit
of lever travel from engagement to real stopping power, tendency to squeal at low speed,
and suddenly grab with slight additional effort. Ambo police just weak performance
on front stopper. Blocked/jacked up the front end so the wheel just cleared the
ground, released the cotter key and pulled the pin closest to the end of the brake tie rod
that adjusts, and locked the wheel with the cable adjuster so that wheel can just be
turned with reasonable effort. Then adjust tie rod length so that with lever on
second shoe engaged by hand you get about twice as much resistance to wheel turning as
with one shoe. **Check it with the pin installed, not just by eye, as there is a tiny bit
of unavoidable play in the linkage. Pin everything back up and back off cable
adjuster again. Result: about as good a front brake as you could want without
discs--great feel and progressive action, just like the designer intended. (Discovered the
Eldo had uneven pressure on shoes, and Ambo was definitely braking with one shoe only!!)
Paul Friday's original instructions: Setting up the Twin-Leading Shoe Front Brake
Following a recent embarrassing meeting with an MOT tester, I became aware of
the need to set up the twin-leading shoe front brake, and in fact it could not be easier.
The problem is that unlike a single leading shoe which automatically holds both shoes
against the drum to almost exactly the same degree, the twin-leading shoe can be used with
the owner oblivious of the fact that only one of the shoes is in fact in proper contact.
SO to set the twin-leading shoe front brake, remove the split pin through the pivot pin on
the connecting rod at the end nearest the inline adjuster. Then tighten the cable adjuster
on the lever or the front brake plate so the brake (for one of the shoes anyway) is hard
applied. Then slacken off the locknut to the clevis and alter the position of the clevis
on the connecting rod so that the hole through the clevis lines up through the lever when
the other shoe is applied by hand.**(NOTE my refinement to this technique above--JW)
When this is so apply the lock nut on the connecting rod and reassemble the mechanism with
new split pins wherever you have disturbed them. Then re-adjust the cable for use. The
brakes will probably take two days to bed in then WOW.
John Wells in PA
Washing Tip from Mick Breen: Here's a good one ........ After washing your bike start up your garden leaf blowing machine (if you have one) and blow away all the excess water from the bike , especially from around all the switches and wiring. It makes it a lot easier to complete the cleaning process.
Helmet Smell elimination tip from Robert Brooks
I used this tip from a motorcycle magazine article from years ago. After
you're done riding, put one of those dryer sheets into your helmet to keep it
from smelling. I have three helmets, and put a dryer sheet into each one of
them after riding, then put them in a helmet bag. They still smell like new
after all these years!
Computer Mount Tip from Al Collins:
I had the Corbin seat off the '98 Ev to install a sealed battery and found that the 3 rubber centered posts which hold the tray for the computer had perished. replaced them with the battery tray mounting posts from an air-cooled Beemer twin. bmw part number is 61 21 1 243 530. price was $2.45 ea from tri-city bmw, rock island, Illinois.
bmw ones seem to be a harder rubber compound and much better vulcanized than the Moto Guzzi part.
Al Collins
Dipstick tip from Rich Arimoto:
The dipsticks on the new Guzzis are very hard
to read. I found that by
roughing up the surface of the dipstick with
some coarse sandpaper, it is
Another dipstick tip from Joe Cook:
The dipstick on my Cal 1100i was nearly impossible to read. The remedy was to paint one of the groves with white fingernail polish. I've been about 12,000 miles and it hasn't came off.
I bought a '98 EV in June. It was bone stock and in pretty decent shape (11K) with the exception of some oxidation on the wheels. This is my first Guzzi (used to ride a '79 FLH) and I couldn't believe the performance and handling when compared with the Harley. My friend and fellow guzzisti Ray Brinker suggested the usual performance upgrade: Open the airbox, K&N filter, new crossover, but I couldn't pull the trigger on throwing down $400+ on a set of LaFranconi mufflers to finish the job. I'd heard a Jackal with the LaFranconi's and couldn't believe the sound: truly the voice of God; big fat bass with the snarl of an angry jaguar on the inhale. Being of limited means, I lusted after these pipes but hoped to find a more affordable alternative. Saw some Dunstall repros on ebay (the megaphone ones-not the reverse cone). Emailed the seller who informed me that they wouldn't fit my bike. I still figured that with some minor mods they should work. The fact that they have removable baffles and looked pretty cool worked in their favor, too. JC Whitney online had the Dunstalls for less than $100- so I figured it was worth the risk to give 'em a shot. Got them a week later. They looked great out of the box. Beautiful finish. They were barely too small for the crossover so I took them to a muffler shop to open them up a fraction. Then I straightened out the stock EV clamps and discovered that they make great mounting brackets! The stock mufflers have a slight upswing but I set the Dunstall's to lay flat. Then time for the moment of truth. Turned the key and fired it up. I almost jumped over the freaking house. The pipes sounded BEAUTIFUL!!! They have everything the LaFranconi's have with a little more bass added! It literally sounded like I just fired up a Ferrari. I know; sound is nice but what about the performance? Unbelievable. It's a completely different bike. It sounds better, performs better; better pull through low revs and quicker throttle response at higher (4 to 6K) revs.I swear it even HANDLES better!!? And they look great! These pipes exceed every expectation that I dared to have. With a little tweaking they're well worth the $100 bucks!
Final Drive Pressure Tip from Bob Echoff:
Final Drive leaks and pressure.
I have been riding since 1967. For the first 20 years I rode assorted English bikes. That taught me to fix things that leak. I have been in the auto repair business since 1970. Things that build up pressure need someplace for that pressure to go. So here is my Guzzi Final drive story.
Two years ago I did a ground up restoration on a 1976 850 T3. When I put new seals in the final drive, a little wear was apparent, but nothing I was going to buy hundreds of dollars worth of gears for.
Sure enough, when it built up pressure, it leaked. Being cheap I vented the system using Guzzi parts. I have ridden it over 10,000 miles since the modification and no it does not blow oil out from the vent and contrary to what a dealer told me, it is getting all the oil it ever did. I even took it on vacation riding it over 1700 miles in 5 days
I do not claim that this will work on any other bike, it is just what I did.. If you want to try it, here you go:
The object it to fit a 1984 Guzzi small block final drive vent to your existing filler cap. The vent costs about 21.00 from your dealer.
My fill plug is concave on top. After you get all of your supplies together the actual operation should take about an hour. If you use epoxy rather than solder it will of course take as long as it takes for it to cure.
You will need:
Propane torch & solder, or 2 part epoxy
A 1/32 inch drill bit
Drill or drill press
Final drive vent from 1984 Moto Guzzi small block.
A bottoming tap to fit the threads of the 1984 final drive vent. Make sure it is a bottoming tap.
A drill bit to drill the hole for the bottoming tap
Course sandpaper
Teflon tape like plumbers use
3 or 4 rubber washers to fit threads of vent Get at hardware store
How to:
Remove the stock fill plug. Put it on bench or table.
Use the sandpaper in the concave part of the top to roughen up the metal. Rough it up good!
Clean it. Use your favorite solvent but clean it really good.
Now get out either the propane torch and solder or epoxy
If using solder, put the plug lightly back in a vise. Heat the plug until your solder flows easily then fill the concave top of the plug with the solder. Do not overheat it. When done let it air cool to room temperature.
If using epoxy, mix according to manufacturers directions and fill the concave top of the plug. Let harden.
When the lead is cool or the epoxy is hard, find dead center of the top of the plug & mark the spot with a punch or awl.
Put the plug lightly in a vice or better yet use a drill press
Take a 1/32 inch drill bit, and drill all the way through until it emerges from the bottom of the plug .
Remove any material left over. I removed the entire magnet as it did virtually nothing anyway.
Now take the big drill bit, the one for the bottoming tap, and using the 1/32 inch hole as the guide, drill just through the epoxy or solder. Go slow. Do not over drill it
Next take the tap and cut threads in the epoxy or solder. Go slow. Remove the tap every so often to see where you are.
Clean the new threads of any shavings.
Make sure the 1/ 32 inch hole is clear.
Screw the vent into the threaded plug by hand. Note the amount of thread sticking out after the vent has seated.
Unscrew the vent and install enough rubber washers on 1984 vent to fill that space.
Wrap the threads of the 1984 vent in Teflon tape and thread it into the original fill plug Do not overtighten! & leave enough room at the bottom so that you are not blocking the air hole
Blow through the bottom of the new assembly to make sure air passes through
Install new assembly on bike.
All done.
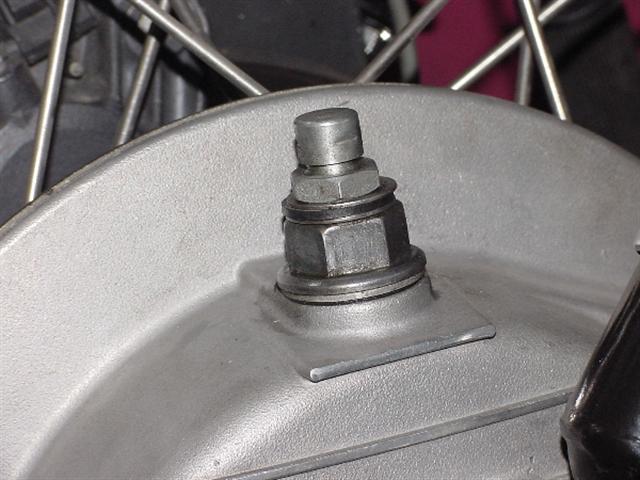
Photo of end result.
Another Final Drive Pressure Tip from Dave Phillips:
To keep my 74 Eldo transmission from slobbering oil all over the place I adapted a plastic tube to the vent and ran it to a square 4.5OZ plastic bottle laying on it's side and held atop the battery with stick-on VELCRO pads. I drilled a small vent hole in top side of the bottle. Once the bottle filled to the level of the tube the excess oil flows into the bottle while ridding and vacuums back into the tranny as it cools down. It works great.
Thanks, Dave Phillips davep@indtoolinc.com See us at: www.indtoolinc.com
V11 EV fluid level tips from Wildgoose: Enough milliliter talk already. How many ounces of fluid does my EV take? Engine - 3.2 Quarts, Transmission - 25.5 Ounces, Rear end - 8.5 Ounces, Forks - 16.5 ounces per leg. Need Moly additive for your bikes final drive? Check here.
Foot Peg tip from David
Many riders new to Guzzi are out enjoying their Jackals. Be aware that the foot pegs on Jackals and Bassa's are held on with a single bolt and the Guzzi factory has still not discovered the joys of loctite. To check your foot pegs for wiggle just grab them in one hand and see if there is any play between the bracket and frame rail. If there is any motion at all and you are not handy with the wrenches head over to your Guzzi dealer and have them snug it up. A little blue loctite would not go amiss either. Failure to do this will result in failure of the bolt and loss of the peg.
Jackal Foot peg tip from Ken Cavenagh:
Fork Oil Changing Tip from Russ Marooney:
Trying
to get oil in the 98 EV forks can be a challange,to say the least. I found a 4oz plastic
bottle at Hobby Lobby $. 79. It has a pointed screw on lid which will fit nicely into the
small fill hole on the forks. I removed the adjusting knobs, and the was able to fill with
very little spillage (couple of drops).
These bottles are also great for topping off the distilled water in the battery.
Russ Marooney OKC
2004 MOTO GUZZI
CALIFORNIA EV TOURING Tips from Bob Schantz:
FORK OIL CHANGE PROCEDURE
REQUIRES 485ml OF SAE 10 FORK OIL FOR EACH FORK
-------------------------------------------------------
1) Put the motorcycle on the centerstand. Put a jack under the oil sump with a block of wood between it and the bottom of the sump and jack up the motorcycle until the rear wheel is just touching the ground. The front wheel will be off the ground and you will have enough clearance to remove the forks.
2) Remove the fairing.
3) Remove both front brake calipers and carefully set them over the exhaust pipes so that they cannot fall.
4) Remove the front wheel.
5) Remove the four bolts from the lower fork brace (the piece that the fender is attached to). Carefully (no scratches) remove the fork brace with the fender attached. You will have to rotate the lower part of the forks 1/2 turn so the assembly can slide out between them.
6) Loosen the upper pinch bolt.
7) Loosen the fork cap 1/2 turn or so. They aren't very tight so a 12" crescent wrench will do the job nicely. Don't worry, they're NOT spring loaded.
8) Loosen the lower pinch bolts.
9) Remove the fork by pulling it down out of its clamps. Using a large screwdriver, gently pry open the space in the lower fork clamp a very small amount and the fork will slide out much easier and you won't be so likely to scratch it.
10) Completely unscrew the fork cap and pull it up as far as it will go. It does not come completely off. Take care not to damage the O-Ring.
11) Turn the fork upside down and the oil will come running out. When it stops draining turn the fork right side up and pump it several times. Turn it upside down again and more oil will come out. Do this until no more oil comes out.
12) Measure out 485ml (or cc, they are same-o same-o) and slowly pour it into the small opening at the top of the fork. A small funnel fashioned from aluminum foil works well.
13) Coat the O-Ring with a little of your new oil on the tip of your finger and screw the fork cap back in far enough that the O-Ring makes a good seal. Don't worry about tightening it all the way, you will do that later.
14) Slide the fork back up through its clamps (prying with the screwdriver again) until the fork cap is completely through the upper clamp.
15) Snug down the upper pinch bolt enough to hold the fork firmly in place.
16) Tighten down the fork cap. Don't overtighten it as there is no strain on it and the O-Ring makes the seal.
17) Loosen the upper pinch bolt again and get the fork positioned to the point where the bottom of the fork cap is just showing above the clamp. Rotate the fork so your adjusters are lined up the way like them. Tighten down the upper pinch bolt.
18) Tighten the lower pinch bolts.
19) Repeat steps 6-18 on the other fork. Make sure when you have both forks reinstalled that they are as close as possible to the same height.
20) Replace the fender/lower fork brace assembly.
21) Replace the front wheel.
22) Replace the brake calipers. Pump the front and rear brakes a few times.
23) Remove the jack from under the motorcycle.
24) Straddle the bike, grab the front brake, and pump the front end up and down several times.
25) Remove the two Phillips head vent screws from the fork caps to release any air pressure and replace them.
26) Replace the fairing.
27) Go for a ride.
Bob (I'd rather be camping) Schantz
Fuel Tank Air pressure Tip from Stan Hokenson:
Excess air pressure in your fuel tank on the EV, and I imagine on the others also, can
be eliminated. Take apart the fuel tank locking cap, which I bet many already have,
take out the rubber gasket, and you will see two small holes drilled through the metal
along side of the key tumbler. Take a small drill bit and drill through one of the
holes into the plastic underneath, just far enough to create an air vent. Put your cap
back together and you will have no more pressure problems.
Fuel Tank Air pressure Tip from Dale Kessler
I had trouble getting the gas cap off when it was time to fill up, so when I removed the tank to change the air filter ( K&N) and fuel filter (see tips on this page) I eliminated the plastic check valve on the vent hose on the front of the tank, and made a splice out of one quarter inch copper the same length as the check you take out. The copper was a water supply line from a refrigerator ice maker, but I guess anything like that will work. No more problems with the gas cap and the bike runs great.
Recently the internal fuel line on my 2003 EV Touring with in-tank fuel pump blew off and left me stranded.
The dealer replaced the line with regular 5/16ths I.D. fuel line. That lasted about 4 days before it blew off. I removed the fuel pump and found that the line had begun to get mushy on the outside. I found a Gates hose that is rated for total submersion in gasoline. The Product number is 4219-05184 and the Part number is 27093. Any hose for this type of service should have "SAE 30R10" printed on it. Regular fuel line is SAE 30R07 and fuel injection service line is SAE 30R09. I will pick up the new line tonight and try it out this weekend. Wish me luck! Here is a link to a PDF on the new fuel hose....
Bob Robinson
Headlight tip from Karl Kologiski: This is one for the loop framers, A nice cheap replacement for the chrome headlight retaining ring for the V7's, Ambassadors, and Eldo's is one from a Russian Ural. I picked one up at the local dealer for around 20 bucks and it fits great. The Ural ring is a little thicker than the Guzzi CEV ring, but other than that it looks stock and you can not beat the price !
Taillight tip from Aron Larson:
Replacement Tail/Brake light bulbs for California 1100i & California/EV:
NAPA: Stock# BP1157 - Found 'em locally - $1.39 for two bulbs in a pack
Wal~Mart - They use # 1157 also - Found 'em for $1.89 for two bulbs/pack.
Dealer price w/shipping -about $8 & you wait 2 days or more.
Replacement 15V Fuses for California 1100i & California/EV
Wal~Mart sells "Buss Fuses" brand ATC-15 5 Fuses - Was under $2 but I
don't' remember the exact price.
Cracked EV headlamp tip from Steve Saady:
A few days back I reported a cracked headlamp lens on my 98 EV. Rumor had it that a full lens and reflector replacement from Guzzi was about $250. A dealer reported that the reflector and lens are separate parts. Cheaper, but still pricey. Someone else reported that an older BMW possibly used the same setup.
Then I was out for a tour and so I took the broken bits to a BMW Dealership.
Apparently a 750 or 900 BMW uses this same two-piece lens/reflector arrangement. They had the lens/gasket in stock and sold it to me for $29. Such a deal. The lens had the same BOSCH part number cast into it as my original: BOSCH 2 305 602 005 (look in the lower right corner, about 5 o'clock position.) The lens came in a BMW box with an original BMW part number of: 63 12 1 243 541...Pop in installation. Happy and back on the road after dark.
Headlight tip submitted by Steve Saady, pulled from Jackal Owers group forum on Yahoo:
Not complaining about the larger light on my Stone, but wanting the best light output possible, I have been experimenting over the last 12 months with different H4 bulbs. From the standard, through to the new Xenon bulbs. After much cursing at so called "these are the best", which turned out to be false, I have found one that not only lives up to its name, but is the best of anything so far tried. I'm actually not trying anymore as these out perform anything else, and I'm extremely happy. They are expensive, and if you only occasionally ride at night then stay with your standard ones, as the expense does not justify the means. If you ride at night on a regular basis, then it is time to light up the road ahead. The bulb? Philips Vision Plus H4 bulb. In Australia available from all Autobahn stores at $60.00 a pair (you have a spare one!). For more information do a search on Google on "Philips Vision Plus". Do not seem to be sold in USA, but are everywhere else. They claim up to 50% increase. The reality is about 35-40% increase on low beam and only about 20% increase on high. You get a longer pattern down the road (about 10-20 meters) and a better spread to the side. With a little adjustment, this can be extended further, but may upset the vehicles coming the other way. The best yet.
Simple, cost effective Highway Bar tip from Fred French:
ere is what I have done on my '99 EV so that I can stretch out my long legs. The crash/roll bar on the EV is reversible! Simply undo the two bolts at the top, and the bottom ones on either side, reverse it, and re-bolt. (Still looks like it was designed to be mounted that way.). In place of the lower mounting bolts, I mounted a set of Harper's Highway pegs. On the reversed crash bar I mounted a set of Universal, folding highway pegs. This gives me several options. I can place my feet on either set of pegs, or on both at once, giving me full heel and toe support without having accessory "highway floorboards" sticking out. For me, at least, this gives at very simple, comfortable, alternative seating/riding position.
Fred French...Wisconsin license plate "MG4ME"
Key Blank tip for EV supplied by John O. of the MGNOC Discussion page: Blank for '98 is a Cadillac Allainte.
Key Blank tip for EV from Chris Hagemann:
Ignition key for the 98 EV11. I searched around and found the correct key for the 98 Ev from a dealer. The part number is 30735500 and the cost is 5.95 plus a little freight. This is the correct Italian key blank and works perfectly. Much better than trying to find a substitute blank.
Chris Hagemann
Key tip from Randy Dawes:
Key blanks for '70s or '80 Guzzi's are Fiat or Yugo (same) in case you need 1 somewhere & the local locksmith doesn't have a clue. I understand some Harleys use these blanks too.
Another Key Tip:
Some Guzzi's (I don't know what years) use a blank that is made by silica the number is ZD14RP it is also used on some Porsches made in the 60's it is a double sided blank and is only available with a rubber head
Trip odometer tip from Marco Vera:
Knob for your partial trip odometer come off & gotten lost? Go to your local Ace hardware store, go to the section with the misc supplies in all those little trays and look for knobs & shafts for household lamps!?! I found a great brass shaft & tiny plastic knob for $0.80! And know that Le Mans III knows how far it goes on a tank full!
Condensation tip from Jaap Veldhorst:
V11 Sport/Le Mans fogged up tachometer:
Info
on oil for new motors with hydraulic lifters from Chris
Galardi:
Just cleaning out some emails and ran across this one I had received back in January from
MGNA.
This is information I received from Moto Guzzi North America. Following is an email they
sent to me:
I can only recommend that you use 5W 40 due to warranty issues.
I recommend you use one of the two manufactures 1 - Valvoline Synpower and
is distributed by NAPA stores and 2 - Golden Spectro ATV-Snowmobile.
I hope that you are enjoying your Moto Guzzi.
Regards,
Moto Guzzi
North America
Relay Tip from Joe Cook:
I went through the relay book at my local NAPA and came up with a replacement for the start, headlight, fuel pump, etc relays for my 94 Cal 1100i for about $15.00. The NAPA part # is AR 175. The housing is slightly larger, but it fits, and all the pins and electrical specs are the same.
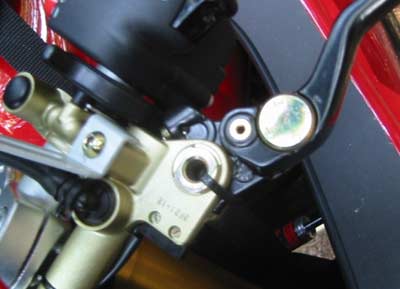
Side stand tip from Jeff Swanson
I am the proud owner of a new (to me) 2001
Jackal...only has 4200 miles on her. I didn't care
for the "side stand deployed bike no start feature" so I removed the side stand
switch from the side stand, put a small piece of rubber into a standard air valve stem
cover and screwed that onto the switch end. It holds the side stand switch in the closed
position to allow starting. Then I zip tied the switch to the frame and problem solved.
Another side stand tip from Frank
Smith
I made a simple revision to my 2001 Calif. Special a few days after I
brought her home. The side stand switch had to go. I cut a narrow strip of
flashing I had in the shop and molded it to cover the micro switch that the stand
kisses. I used a plastic wire tie to hold it in place and it has ridden with me for
the past 2500 miles. Warming the bike up on the stand is not a problem. Just
beware you can not start it in gear. Duh!
From: Joe Tondu
On the newer Guzzis the easiest way to
disconnect the side stand switch
is to disconnect the side stand switch. Pull
the sucker out, tape the
lead, and tie it off under the tank with zip
ties. Done.
Another side stand tip from Brad Kopp
For those with a 2000 or newer bike it is not necessary to remove the sidestand cut-out switch. you can simply start the bike w/stand up and then re-deploy the sidestand, your bike will not shut off! from fotoguzzi@yahoo.com
Another side stand tip from Ken Munger:
Seems everyone wants it gone. Easiest way, at least on MY 98 EV. As the sidestand relay must be energized to kill the bike just cut one or both of the relays power inputs. All associated wiring remains the same.The relays are cheap and can be replaced easily if you want the function back. I highly recommend you consult the wiring diagrams if you own a different bike or year of model.
Another side stand tip from Brad Kopp:
Your sidestand can be much easier to deploy if you remove one of the two springs. It reduces the tension and a short legged rider will have an easier time with it. Still has plenty of spring tension to hold it up. I've run mine this way for about a year w/no problem. Brad Kopp fotoguzzi@yahoo.com
Another side stand tip from Greg The Sign Man:
I bought a new Titanium last spring and when I wound it out it would act like I was hitting the rev limiter even though I wasn't near redline. To make a very long story short, the problem was the side stand kill switch. There was just enough contact to start the bike but high speed vibes made it miss or die. A simple adjustment at the switch cured it. I also eliminated the PVC style valve on the gas tank vent, there was so much suction in the tank I could hardly get the gas cap off at times. While I was at it I eliminated the evaporation canister, plugged off the intake manifolds and used the space where the canister used to live to carry a tool kit. I checked spark plug readings after these mods & all is fine. Oh, I also ran a one inch hole saw through the muffler baffles and along with a little more power the sound is PERFECT!
Ev side cover tip from Dale Kessler
This tip pertains to the side covers on the
EVs, Jackals, and Stones.
One of the side covers cracked on my 98EV, and
I determined the very top
of the cover was not positioned correctly
behind the seat when it was
put back on. The seat was on top of the cover
instead of the cover
being behind it. When you sit on the bike it
forces the cover down and
cracks it. I also lined the new covers with a
liquid rubber compound to
Sportbike Tool Kit Location Tips
Tool Kit Location tip from Steve
I stash a tool kit on my 96 Sport in that big hole in the frame just above the swing arm pivot. I block both ends with test plugs for PVC pipe from the hardware store.Ev spotlight tip from Norman Schultz
I installed a set of National Brand Spot lights on my 1999 V11EV. I used lights for a Yamaha Virago 1100. The mounting bracket fits almost the same as the fork bolts on the bike. You can drill the mount to fit exactly or do like I did and make two small stainless steel plates to adapt the mounting holes. I did not want to drill on the chrome and deal with the rust later. I used a toggle switch to turn the lights on and off, and placed an automotive audible warning device from Wal-Mart to remind me to turn it off when the ignition of off. The lights cost $199.00 and the warning device cost $6.00.
If you want to dress up the European license plate mount, take piece of stainless steel plate (mine came from a serving dish bought at a flea market) and cut it to fit the space below the license plate. I buffed the plate a dressed it up with some chrome skull bolts and it looks great.
Ev spotlight tip from Joseph Martin
I'm always interested in more conspicuous lights for the bike. I happened
upon the truck light section at a Pilot Truck Stop a few weeks ago and saw
these cool looking big round turn/stop/tail light lamps. The ones at the
Pilot didn't have a double wire lead, so I did a little checking, and found
the same unit at NAPA with a double lead. The NAPA part # is 3812, and cost
$17.99 each. The unit is about 4" in diameter and shows amber to the front
and red to the rear. It uses a readily available 1157 dual element bulb.
First, take off the lens cover for the front turn signal and determine which
lead is the power for the turn signal and which is the ground. Remove the
stock turn signals from the front of the bike. Tape up the ground as the
NAPA unit grounds to the frame. Snip off the old 1/8" female terminal from
the turn signal power lead and replace it with a water proof crimp on 1/4"
terminal. Remove the head light from the bike, place a folded cloth on the
fender between the forks to lay the head light on. Open the head light bezel
to get access to the small parking lamp inside.
I used a 1/4" piggy back side terminal to tap into the parking lamp power
lead which is inside the head light bezel. The piggy back side terminals are
available at NAPA, part # 784381. I fabricated a power lead for the lamps
by twisting two 10" lengths of 18 gauge braided wire together and crimping
both into one of the piggy back side terminals. You just unplug the female
terminal of the power lead from the parking lamp bulb, plug the fabricated
power lead on to the bulb and then plug the parking lamp power lead on to
the piggy back connector. Run the fabricated power lead out the back of the
head light bezel. Then, crimp a female water proof 1/4" terminal to each end
of the fabricated power lead.
The NAPA units mount right in the holes for the original turn signals. After
you mount the units, put waterproof male terminals on the black and red
leads coming from the NAPA unit. The red lead powers the "bright" element of
the 1157 and the black lead powers the "dim" element. You will use the
"bright" lead for the turn signal and the "dim" element for the running
light. Plug the red lead from the NAPA unit to the turn signal power lead
and plug the black lead from the NAPA unit to one end of the fabricated
power lead. Repeat process on the other side.
You now have running lights/turn signals on the front of your bike that are
twice the size of the originals, which were not running lights. The red to
the rear adds a lot of visibility from the side and the rear of the bike,
and helps remind you to turn off the turn signal. The bike also sort of
resembles a police bike with those big lights on the front. I have noticed
people giving me a double take when they see the bike and even moving out of
my way on the Interstate commute to work!!
Steering Head Bearing Inspection/Replacement
Tip from Chris Hagemann:
I used the manual to disassemble the steering head; the instructions were a bit sparse so here is some additional information that might help.
Put the bike on a lift, keep the center stand down during the entire process and for safety leave the bike in gear. I put a board under the oil pan and lifted the bike up until the front tire was 1" of the ground.
Remove the tank and the left and right front chrome covers. Remove the brakes off of the wheel and gently lift the calipers up and over the handlebar. I disconnected all the holding brackets from the fender and frame for the brake lines to make it easier to rotate the calipers. The factory book says to disconnect the calipers and refill /bleed lines afterward. This seems a bit more work than necessary.
Remove the instrument package, take the housing off of the speedo and remove the speedo cable. Pay close attention to the little washer/spacer in the speedo cable nut, I forgot to put it in once and had to reassemble the entire unit again costing valuable time and a little aggravation.
Loosen the left side bolt for the headlight to allow the speedo cable to come free, then remove the four bolts that hold the headlight bracket to the upper and lower braces. The wiring harness for the lights, instruments and ignition will all have to be disconnected, all easy with the quick disconnect couplings. Now the front fork clamps are bare and ready for removal.
Loosen the pinch bolt that holds the top clamp, remove top clamp cap, and loosen the top pinch bolts on each fork tube. Lift the handlebar assembly up and off of the bike. Lay it down on the airbox.
The top nut holding the steering head together has four notches in it for a special type of spanner wrench, very similar to the adjusting wrench for the rear shocks, I made one out of 1/8” flat stock to match the outside radius of the nut and notch. It doesn’t take too long to cut one out with a hacksaw and a ½ round bastard file. Use a compass to scribe the arc on the steel, add the post for the notch and cut horizontal slots down to the arc. Cut away the little tabs left over from the saw and clean up with the file. Make sure you put a handle on your file, poking yourself in the wrist with the pointed end of the file will ruin your riding for a while.
Unscrew the top nut and the wheel assembly will begin to slide down out of the head, slowly unscrew until the top nut releases. Lift out the bearing, put it aside and slide the entire wheel / fork tube assembly out from under the bike.
The lower bearing is pressed onto the shaft of the lower fork brace. If it is ok, just repack the bearing. If the inner race in the steering head is bad and your lower bearing is toast, then it will have to be removed. My lower bearing was a ball of rust, which meant it had to be removed from the shaft. I loosened the lower fork brace from the tubes and removed it, put the inner fork brace shaft in a padded vise jaw, split the outer covering off of the bearing and removed all the rusty little bits of what once were the roller bearings. Then I took a Dremel cut off abrasive wheel and cut into the inner race until there was enough metal removed to weaken it. Placed a cold chisel into the notch, gave it a good whack with a hammer and split the race. Once split, the inner race slid off easily.
Bearing number for top and bottom are the same. 30205A. Use 30205, they cost about 15 bucks each from the auto parts store.
Removal of outer bearing races in the front head is pretty easy, use a long drift and lightly tap around the inside of the race to push it out of the head. Do this evenly and slowly to not upset or scar the inside of the head. Use a nonferrous drift to push the new race back into the head. Take your time and don’t allow it to go in unevenly. Make sure it is properly seated, clean thoroughly and lubricate generously.
I like this part. Reassemble in reverse order.
Synthetic Oil tip from Matt Wooten
I recently had a leak on my 97 sport, coming from the front transmission seal. I tore the bike apart to replace this seal and noticed that the input shaft had a lot of up and down play. So I decided to take the transmission apart to replace this bearing, once I split the tranny I noticed that most of the bearings had just fallen apart. all of them but one needed replaced, This bike only has 10,500 miles on it, and it has been well kept for, I emailed a major bearing distributor and told them the problem that I had. They told me that if I used synthetic oil in my transmission with bearings that have a plastic cage, the bearings would fail prematurely. The bigger bearings in Guzzi tranny's do have plastic cages. A week later another bike came into Ace Malott's garage where I'm doing the work, and they wanted him to fix a leaky front tranny seal, well this bike had the same trouble that mine did except the damage went a lot farther on his bike it ruined every bearing and both shifting forks. My bike has had synthetic oil in it for its whole life, the other bike has only had it for a short while. I warn everyone on the use of synthetic oil this is not the only cases where synthetic oil is to blame.
Replacing Timing Chain on 850-T from Carl Sederquist. Surry, Maine:
Using the suggestions from the responses received to my message of 24 November '04 on the Wild Guzzi discussion site, I successfully replaced the very loose timing chain and tensioner on my 850-T while engine still in the frame. The parts used were chain with master link P/N 2805 8060 V13, self adjusting tensioner P/N 1305 8200 0010, front motor seal (timing case cover) P/N 9040 2840 and the 2 inch, 5mm alternator rotor removal tool P/N 1490 6600.
The procedure to follow after removing the alternator, stator, and timing case cover was as follows:
1. Set (with plugs removed and in neutral) the left cyl. to TDC and "S"
in the flywheel inspection hole. The timing marks on the crank gear and cam gear will be lined up. Insert the spark plugs and place in low gear.
2. At this point loosen the retaining nut on the oil pump gear. It is easier to do now rather than after the chain has been removed.
3. Stuff rags behind the gears and place aluminum foil behind and around oil pump gear such that only the link to be ground off is exposed.
4. Choose a link that is in the lower right hand portion of the oil pump gear, about the 23 to 25 min. position. Make sure there is room to push back the ground off link (there is a bolt head to clear behind there).
5. Using a Dremel tool and the heavy duty cut off wheel (size of a quarter) grind the link pins flush with the link. With a pin punch, needle nose pliers and small cold chisel the link can be popped and the link pins pushed through releasing the chain.
6. Remove the old fixed place tensioner. the mounting bolts and stand- offs do not need to be replaced.
7. Remove the oil pump gear to get at the lower mounting bolt for the new self adjusting tensioner.
8. Remove the tensioner arm and adjusting spring from the mounting plate pin as it is easier to put the new timing chain back in without the tensioner arm in the way. Then mount the tensioner plate to the two lower right bolts that secure the front main bearing. Replace the oil pump gear, lining up the gear keyway and tighten the retaining nut.
9. Rethread the new chain around the crank, cam and and oil pump gears such that the master link will be replaced at a position about midway between the crank and cam gears where the timing case is deepest.
10. Using the ground off chain link, push this link through from the top side to hold the chain together. Then using a pair of bent needle nose pliers and your fingers (and lots of patience) push the master link pin up from the bottom side inserting the center link plate as you go until it is completely through and the top chain plate and clip can be fastened.
11. Insert the tensioner arm and spring back on the tensioner mount pin and flatten and push the arm down on the spring and against the chain until it is seated. Replace the tensioner retaining washer and locking nut on the mounting pin and you are done.
12. Clean up and replace the front timing case seal with the new one and button everything up. According to "Guzziology" the alternator retaining bolt should be tightened to 25 ft/lb
Recommended tires Tips from Wildgoose for your California EV, Bassa, Jackal, Stone, Special Sport, California Special, California 1100, so on.
|
Front |
Dunlop |
491 Elite II |
MR90-18 71H (wider) |
20-30K miles |
or 491 Elite II 100/90H18 (narrower) |
|
Rear |
Dunlop |
K491 Elite II Touring |
MT90HB17 76H |
12-18K miles |
Tire Bead Breaker Tip from Jack Green
Motorcycle Tire Bead Breaker: Depending on tire size, I use three, 4" x 3" (centerline of threads to back) "C" clamps for dismounting tires on my EV. After wheel is removed and tire deflated , place two clamps at 1/3 points around tire circumference and the third clamp halfway between these two. Place clamp points as near the wheel rim as possible. Tighten clamps until both sidewalls squeeze together. Wait a few minutes and the tire beads will slide toward the center of wheel. Take clamps off and pull tire off wheel by hand.
Jack Green
Another Tire Tip from Keith Casner:
TPS Tip from Jeremy Ogden:
Here's a tip for California style bikes' TPS... 27271-95 HD (TPS) I checked and A dealers price is $126.00. They were happy that they could get one for $40.00.
Swapping Tip from Wildguzzi:
Here's some 15 minute TPS instructions I have sent to
several people who have changed their TPS this way successfully.
1. Mark with a pencil, the line on the current TPS in reference to your throttle body.
2. Get a digital volt meter (analog will do no good for this application), set it to the lowest DC setting on there, usually MV.
3. Pearce the 2 outer cables that go to the TPS, and take the reading (ignition on).
4. Turn off ignition and pull the old TPS off.
5. Put the new one on, and line up the line on the TPS with the line you made on the throttle body.
6. Snug the bolts, but don't tighten. You'll still need to turn the TPS.
7. Rotate the TPS (key on) until you have your old reading. A hair width of a turn will make a HUGE difference. I used a screwdriver and tapped it until I found the reading. Its a picky booger.
8. Tighten the bolts.
9. Start the bike.
10. Take off.
Swapping Tip from Russ Marooney
Last night Cathy's 98 EV with the hack went dead, without any warning. This happened once before at a gaggle. This time we were just a few miles from home. It had another (second ) Electrex R51 regulator in it. Prior to buying this one I was assured that they had beefed the new models. I was on the phone with them today and it was 2 months out of the one year warranty ,but they said they would back it any how if I would send it back.
In the mean time I got an idea. The Harley has a similar single phase system . A friend owns a custom chopper shop and carries them from Custom Chrome PN25359. He let me take one home on loan. I was able to run the test without modifying it . At 4000 RPM's ,I get 13.88 Vdc. That is with a battery that reads 12.95 VDC at rest prior to starting.
It does take a bit of modifying , I had to drill a hole in the mounting plate , Change the ends on the two leads going to the alternator. On thing it does not have , is a lead going to the Batt indicator light. I use meters anyhow.
Here is the info off the label
For Big twin models from 1976 to 1980.
OEM 74510-75A 74512-79A
Price he had on the box was $51.99
My suggestion is keep this information on the bike so if you should have a problem on a trip you have a alternative to renting a truck carry your bike home.
Russ Marooney